Friday, August 26, 2016

Stained glass window ornament


My show schedule has been wearing me out lately, and I decided to take a bit of time off to regroup and recuperate.

In addition to reorganization of my work studio, which slowly took over most of the lower level of our house and ended up being also a storage space for every craft imaginable, as well as a dumping ground for random odds and ends; I decided to take some classes which can be crossed off my “bucket list”.

Stained glass class is one of them. My main goal, in addition to trying something new and harnessing a new to me medium, was to learn how to apply stained glass techniques in my vintage glass button jewelry.

Some of the buttons in my stash are transparent, reverse painted or antiques made of fragile glass, and I had to find a different way to use them without risking damage and properly showing off their beauty.

I believe, that applying stained glass techniques with help me with achieving this goal.

The class I took at the Art League of Long Island was so much fun. I found glass much easier to work with than I anticipated. The truly hard part for me turned out to be soldering, which I figured initially would come naturally, since I have some experience with metalsmithing. I imagine, it will take a lot of practice and patience, but even though I can see every mistake I made while creating this lovely tulip suncatcher, I think, I did a pretty good job for my very first try;O)

I’m planning to take another class in the fall, which concentrates of applying stained glass techniques as well as fused glass techniques in jewelry making.


I’m planning to take another class in fall, which concentrates of applying stained glass techniques as well as fused glass techniques in jewelry making. 

Can't wait!


Thursday, March 10, 2016

Glass button bangle bracelets

My obsession with buttons got a bit out of control. I might be at a point, where weekly meetings might be beneficial, but I know, I'm not the only one in need of them;O)

In a meantime, I keep coming up with new ways to use them, which springs on a need to get more of them, because I might need a different size or a specific shape. It's a vicious cycle, I tell you, and I love every minute of it.

Last year, bangle bracelets became one of my favorite items to create, and there is quite a bit of them in my stash which will grace my show table as well as Etsy shop.

Blue Sunflower

Gilded Fern

Red Leaf

Gilded Midnight Blue Gerbera Daisy

Saturday, March 5, 2016

What's new at Jantar Handcrafted Jewelry?

I might have gone nuts for the expandable charm bracelets;O) I have introduced a couple of designs at shows last year and they became an instant hit. Every single one is "a story" as one of my customers mentioned, every piece carefully selected and added just in the right spot. 

Best thing about them? They are so much fun to make! and the possibilities are endless...

Afternoon Tea
Seaside Escapes
Let The Music Flow

Wednesday, April 2, 2014

New Vintage style jewelry on Etsy

New items will be added this week to my vintage style jewelry shop. Come and check it out!


Sunday, May 27, 2012

Button Jewelry on Etsy

Wednesday, August 10, 2011

Button Post Earring Collection

The idea to transform little vintage buttons into earrings kept nagging me for quite some time, but taking a crack at it sure took even longer. The logistics of removing and sending down the shanks off of tiny buttons, which when held down between my fingers leave very little space to maneuver the Dremel sanding attachments, took a bit of brain burning. None of the sanding tools in home improvement stores or pliers seemed to be helpful, but I finally figured out the best way to prep the buttons.

To minimize the horrible glass dust cloud, which used to banish me to my back yard, I purchased a Plexiglass grind box. I wish it was a bit bigger since maneuvering the Dremel and the buttons needs some finessing, but I love the fact, that I was able to get rid of the dust mask and goggles. My fingers still get sanded, burned and poked with flying bits of glass, but the final effect is so worth it.

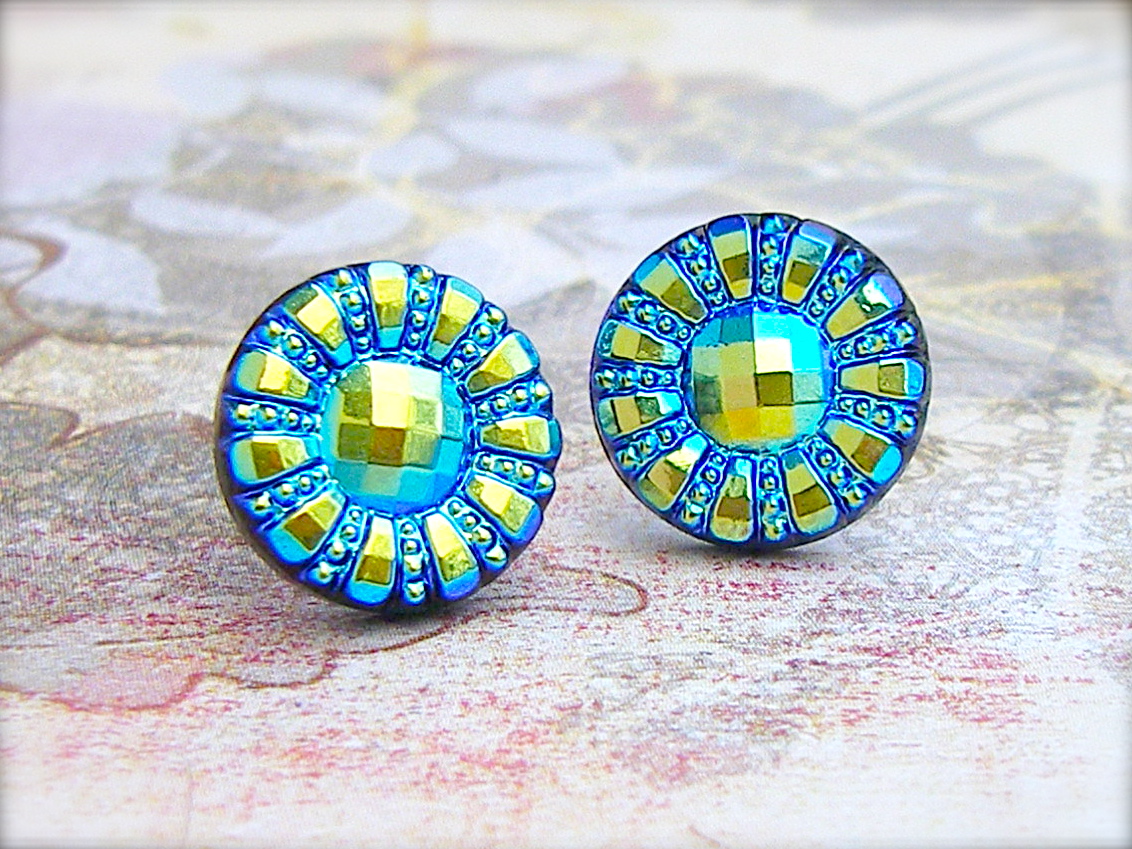
Some of the buttons I found are modern, made using the same old molds used even back in the 19th century. They are truly stunning, especially in the lovely shades of blue with golden yellow aurora borealis finish.


The vintage and antique buttons are my favorite, some near 100 years old. I get a bit nervous, when working with them, since not all of them survive the assault of modern day power tools...


This last pair of buttons is 80-90 years old. I love how the hand painted background makes the raised flower design pop.


To check out more of the button post earrings, visit my flickr page or my Bonanza shop

Sunday, August 7, 2011

I'm back!!

After two-year long hiatus, Jantar Handcrafted Jewelry is resuming a show schedule with first appearance at Broadway Festival on September 4th 20011 in Manhattan. My booth will be located between 10th St. and 11th St.

It has been a long time. Hopefully, difficult times are behind me and I really look forward to what the future holds for me.

My newly acquired Pennsylvania, New Jersey and Massachusetts sales tax licenses are "burning in my pocket", so I will be participating in street fairs and craft shows there also.

I'm looking forward to reconnecting with my old craft show friends, I miss you guys! I apologize for dropping of the face of the planet, but looking back, I know, it was necessary. As they say, what does not break you, makes you stronger...

Lots of great things happened in my studio over the last few years. New designs came to life and I had to pack up my studio and move it into a new space on a very short notice. My new studio has more natural light and there will be no more risking frost bite during winter time;0)

I will be sharing my new designs little by little, so keep checking my blog for new posts.

Thursday, July 23, 2009

Salsa recipe


Several years ago, we where invited to a barbecue and that's when I first tried homemade salsa on top of my steak. Since then, there is no barbecue without this great side dish for my family and friends, and even our kids love the veggie boost ;O)
Salsa is great all year round on not only steak, but also chicken or even meatloaf.
Ingredients:
  • half of white onion
  • 2 medium tomatoes
  • 1-2 jalapeno peppers
  • 1-2 lemons (depending on size and amount of juice)
  • cilantro
  • salt to taste
1. Chop all the veggies finely and place them in a mixing bowl.
Use 1 or 2 jalapeno peppers depending on how hot the peppers are, and on your personal preference. It's a good idea to use gloves while chopping the peppers; sometimes they are very hot, and the skin burn afterwards is not very pleasant.
2. Roll a lemon on a flat surface applying pressure to release the juice before cutting it in half and squeeze the juice into the bowl.
3. Add salt to taste. (I personally use quite a bit of salt.)
4. Mix the salsa and leave it for a bit to let the flavors mix.
If your salsa is too spicy for your taste, add finely chopped cucumbers, but allow the flavors to mix first as the salsa becomes milder after a while.
I also make a different version of this recipe without the tomatoes, which we use for steak tacos (great way to reuse leftover steak the next day after grilling). All you will need are some corn tortillas, which will be topped with reheated steak cut into pieces and salsa.
Enjoy!

Saturday, April 4, 2009

Spring Crocuses

The weather, unfortunately is not very spring like... The rain, cold and winds are getting on my last nerves this year, at least we don't have to deal with leftover snow showers Northern states have seen this week;O)) While walking our dog, I was able to snap this photo of beautiful crocuses blooming in my neighbour's front yard. I hope to pull super secret mission this upcoming fall, and plant some crocus bulbs in our front lawn, which I was forbidden to do by my husband. Well, he will have to deal with it:O))

Thursday, April 2, 2009

Jewels and moss treasury

I don't gamble, I don't bet on horses and I'm not into extreme sports, but landing an Etsy treasury list can be certainly filed in same adrenaline pumping category:O) There is something very nerve-wrecking and exciting in watching the number of treasury list go under that magic 333 number and number of visitors climb rapidly. Then your eyes are glued to the bottom of the screen waiting for the box to open and you are holding your breath afraid to even blink, because if you do...it might be gone. Your hand is squeezing the mouse ready to paste prepared earlier title of your treasury and click the finish button. Then you watch it load opening empty grid ready to be filled with beautiful, creative items. Believe me, beating hundreds of people to a treasury list feels great!

Here is the newest treasury I landed just yesterday. Its called ...jewels and moss... and features beautiful jewelry created by the {NewNew} members.


Saturday, March 28, 2009

How-to: "Something Blue" bridal hair pin

My little sister will be getting married this summer and she trusted me enough to give me the extremely important task of designing and creating her jewelry. I'm scared already! ;O I'm almost certain, she will turn out to be my most difficult and outspoken client ever, and I'm not fooled by her when she says "Just surprise me, I'm sure I will love it!"I decided to start with hair accessories.
We went over different possibilities: hair combs, tiaras, hair bends and decided that hair pins would be best. My sister has very fine and "slippery" hair and pins will not only help to hold them in place, but also give the master hairdresser, my brother's best friend, lots of flexibility.

Supplies:
~hair pin
~wire (I'm using 26ga silver plated wire)
~beads: glass flowers, glass leaves, pearls, Swarovski crystals, seed beads go wild! use silk flowers, feathers, old jewelry, sequins, buttons, etc
~wire clippers
1. Cut an 18in long piece of wire, place first petal or leaf shaped bead in the middle of your wire and twist wire securing bead in place.
2. Secure additional 2 petal beads on each end of the wire.

3. Make a couple of additional twists below the little branches.

4. Add glass flower bead topped with "something blue" Swarovski crystal bead leaving about 1/2in of wire bellow the flower.

5. Bend the wire tightly over the edge of the flower bead and twist tightly making sure that the blue crystal stays as centered as possible.

6. Thread a little Swarovski crystal butterfly on the longer end of the wire about 1.5in from twister wire, fold it tightly against the bead and wrap around.

7. Position the butterfly above the pearl branches.

8. Add one more flower bead with Swarovski crystal center at the base of this little bridal bouquet.

9. Thread both ends of the wire through the loop of the hair pin and secure it in place by wrapping around the loop of the hair pin and around the base of the bouquet. Clip off the access wire.

Tuesday, March 24, 2009

Solar Power, going green dilemma

I always wanted a set of nice and shiny solar power panels on top of my roof, I think as far as going green goes, this it the ultimate thing, means you are serious and committed to cutting pollution. I wanted to do something that will really make a difference, but...is going green in this case really going green? Sadly...no...

While shopping in Selden Home Depot, my son Ben picked up a flyer with information on upcoming solar power seminar, which I decided to attend. Of course going anywhere means taking my two boys with me, which is extremely distracting, but I figured, I will manage it somehow, even if I have to cut the seminar short.

I was expecting a crowd when I got to the store, but turned out to be the only person who showed up. The man from GP Solar Power, explained how the system works, mentioned all requirements and figured out, which system would work best for the size of our house. The regular price of the system came up to whopping $60,000, which made me say "Wow!", but after all the discounts from LIPA, The Home Depot, state and federal government, total cost of the system would be only about $8,000. I figured it's worth considering, even though it's still a big number, but as it turned out, we would have to make some drastic changes to our property in order to go ahead with this project, which are absolutely out of the question. Each individual panel is linked to the system in such way, that if any of them happens to be shaded, the whole system is not working and isn't producing power. We would have to chop down at least four of our beautiful large oak trees growing on the edge of our property before installing solar panel system.

I love my oaks, and can't even imagine making this decision. In our case, if I have to choose between clean solar energy and oak trees, I choose oak trees!!

Thursday, March 12, 2009

Spring in pink

I think, I'm starting to sound like a broken record...and I'm not the only one;O) Winter seems particularly long and stubborn this year and we keep getting this bothersome cold weather blasts.

As we all ache for spring, every piece created in my studio seems to be influenced by this wonderful time of year, which seems to be particularly inspiring when I'm cold and can't stand wearing my winter coat any longer.

The Leaf Bouquet necklace is one of my all time favourites. This pink creation is third in this series and is made of beautifully detailed brass leaf, Swarovski crystal beads, vintage West German lucite flowers and Czech glass beads. Very delicate and feminine.


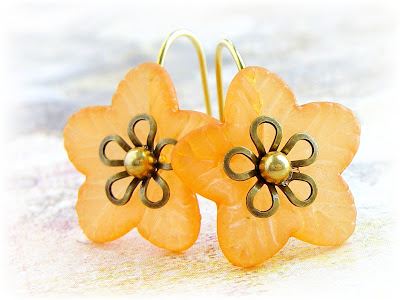
This pair of earrings was a bit of an experiment, which I think turned out super cute. I can almost hear the honey bee buzzing while collecting pollen from this beautiful vintage lucite flowers topped with antique copper bead caps and Swarovski crystal beads.

The last pair of earrings is made of antique brass finish leaf detail bead caps topping wonderfully detailed vintage inspired beads.

They can all be found in my Etsy shop

Thursday, March 5, 2009

Spring Azalea Earrings

I want spring!!!
We have been lucky with winter weather this season. While areas West and North of Long Island had plenty of "white stuff" covering the ground, warm currents helped in pushing the wintery weather away from the island. Well, at least till last Monday... We got more than 12inches of snow:O))
Well, I'm ignoring all the snow outside my studio's windows and thinking spring while working on lucite azalea earrings, and if I close my eyes, I can see them blooming in my back yard...soon, very soon...

Azalea bush blooming in our backyard in spring of 2008.

Sea Foam Azalea earrings and Tangerine Azalea earrings are already listed in my Etsy shop.

The Lemon Twist earrings as well as earrings in other beautiful spring colors will be coming soon:O)

Monday, February 23, 2009

Craft Show season is already here!

Well, not officially, but I already jump-started 2009 season with Park Slope V-day Show and Pop-up Market in Dumbo. It was so nice to see my {NewNew} peeps there!

The hard core {NewNew} grabbed their tables and moved them on 7th ave sidewalk in Park Slope during our first show. It was cold, but as far as cold in New York goes this winter, it turned out to be a wonderful sunny day. I was not prepared for the outdoors, but it was so much fun!


I also sold at the Winter Pop-up Market in Dumbo section of Brooklyn on February 8th and 15th. This is the winter location of the Brooklyn Flea at 81 Front St. I absolutely love the location just 2 blocks from East River! The view of Manhattan Bridge around the corner is breathtaking and I just had to snap some photos.

More photos can be found on my Flickr page:O))

Thursday, February 5, 2009

Thing-a-day, project # 4, Vintage Filigree earrings

Staying away from online supply shops poses a real challenge…yes! I admit…I’m addicted! Last Sunday, friend of mine told me, that she was shocked by amount of supplies in my studio and she did not think I will ever use them all.I will try to use as much of what I already have and try to minimize new purchases. The filigree elements I used for this project, have been purchased probably more than two years ago from a vintage supply shop on the web. I reached for them several times, but did not come-up with anything I really loved to use them and they kept going back into the box. This time I’m happy with the design! The right Czech glass beads arrived just a week ago and with a tiny addition of Swarovski crystal sparkle, they came out perfect!Hmmm…what other goodies my boxes hide? Need to go on a hunt…;O))

Thing-a-day, project # 3


My goal for 2009 is to organize my work as best as I can. Working from home is very difficult if you have kids, home, cooking, soccer practice, very active dog, craft shows on weekends and a husband who works too many hours to juggle. It seems that I can’t keep set deadlines and finish planed projects due to unexpected problems, lol, and Dominick, my two-year-old, seems to have constant emergencies;O)
To keep track of daily and weekly goals, I came up with this sheet, and hopefully this is the final version. I used pages from an old sketch book, which I cut in half and used red permanent marker to draw a table. Each page reflects a week of new inventory created in my studio. I have plenty of space on the bottom and right hand side for the summary, and revere side for notes.

Wednesday, February 4, 2009

Thing-a-day, project # 2

I'm already falling behind in posting, things are crazy as usually...I think, I need to place an order for additional 6 hours per day with Mr Time;O)

Yellow flower earrings are my second craft project. I planned to make them a while ago, and finally did it. They are made of scrapbooking paper flower embellishment. After removing adhesive dot, I sprayed them with several layers of acrylic finish. If I ever make them again, I will use clear furniture finish, it probably will not require as many applications and they will be more stiff. Epoxy might be better also.
I used hole puncher to make top holes and large, unusual earwires to hang the flowers from.
Monday, February 2, 2009

Thing-a-day

I'm really excited to be part of the Thing-a-day blog for the first time. I will be making one craft project every day this month and I'm hoping to get to all the project piling up in my studio, try new jewelry techniques and spice-up my cooking again.
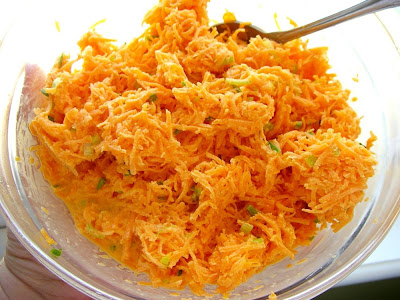
I will be also posting the project results on my blog. Here is the first one, carrot salad made for Ben's birthday partly and his special request, very yummy side dish.
Day One - Carrot Salad
ingredients:
carrot bunch
leak
salt
pepper
1 teaspoon of sugar
1 table spoon of mayonnaise
1 table spoon of sour cream

I cleaned the carrots ( scraped to be exact with a knife) shredded finely, salted lightly, added pepper and just a bit of finely chopped leak. Next, I have combined the mayo, sour cream and sugar in a cup and mixed it into shredded carrot mix.

Wednesday, January 28, 2009

Upcycled Book Tote

There is one New Year's resolution that I'm really looking forward to, and that is to read more books. Motherhood and my home business keeps me so busy, that I rarely reach for a book now. There is nothing more satisfying to do on a frosty January evening than cozying-up on my couch wrapped in warm blanket with a cup of tea and reading a great book.

My kids really enjoy trips to the library, and check out tons of books to take home. To keep them safe and prevent loosing this precious cargo, I decided to make a tote from an old pair of jeans.
For this project you will need:
~ pair of old jean pants
~ machine thread
~ scissors or rotary cutter
~ measuring tape
~ needle
~ embroidery floss
~ buttons
~ fabric pencil or chalk
~ sewing machine
~ cutting mat
~ omnigrid ruler
1. Using side seams of the pants as a guide, make a cut all the way to the bottom.
2. Lay out back of the pants flat and tuck any access fabric under the back seam until flat and pin it in place.
3. Measure 13 inches from the top of the pants and mark it with a fabric pencil or chalk in two places, then connect them drawing a line all the way to the edge of the fabric.
4. Cut with scissors adding 1/2in for seam allowance.
5. Using upper corner of each pocket as a guide, mark vertical seam lines and cut adding 1/2in of allowance. Make sure, that the distance between the pockets and edge of the fabric is the same on both sides.

Please note, if you are using pants in smaller size and would like to make your tote larger, add strips of fabric on each side.
6. Lay out leg part of the pants flat on your work table, pin down piece of the tote with packets on top and cut out with scissors using edge of the ready piece as a guide adding 1inch of seam allowance on top.

7. Measure bottom and the side of the tote piece without the pockets, and cut out one 5inch wide strip of fabric for the bottom of the tote, and 2 strips for the sides.

8. Cut out also two, 4in wide strips of fabric for the handles, I would like them to measure 30in and will add another 3in to the length to secure them in place.
9. Using fabric pencil or chalk, write the word "BOOKS" on the larger piece without the pockets, and hand stitch the outline using any type of stitch you'd like.

10. Time for sewing! Remember that axcess fabric we tucked under the "butt" seam? Using your machine, make a stitch on the edge of factory seam securing access fabric.

11. Pin down two side strips of fabric to front and back of the tote, and sew all the pieces together. Your extra seam allowance will be sticking out on top of the tote. Make sure also, that the inside of fabric is facing out.
12. Using zigzag stitch finish edges of the seams.
13. Pin together and sew front and back pieces to the bottom strip of fabric between side seams. The bottom piece should have a seam allowance on both ends. Sew the short ends of the bottom piece and side pieces together and finish seams with zigzag stitch.
14. To finish the top edge of the tote, use zigzag stitch or double fold bias tape ( I had some leftover from another project). Fold the edge to the inside and stitch 1/2 in from the top edge.
15. To make straps, sew edges of previously cut fabric, iron the seams, turn them inside out and iron again.
16. Secure the straps to the bag and finish embellishing it with buttons.


Embellishing part is so much fun, so go wild! Let your kids make drawings of their favourite book characters with permanent fabric markers, use buttons to spell out "BOOKS" or "READ". Use ribbons, patches, beads or scraps of colorful fabric.

Have fun reading!!